YAML Build Pipelines in AzureDevOps - PipelineAsACode
One of the greatest features in AzureDevOps Pipelines is that you can create build pipelines as a code which are highly efficient and reusable.
It’s not just build pipelines, you can do complete CI/CD in AzureDevOps Pipelines with the help of YAML code, but today we are going to discuss just the build pipelines.
Now before you start, you need to have the following prerequisites satisfied, else it would be only a knowledge session without any practical experience.
- An AzureDevOps account (it’s free with a few restrictions so don’t think! Just go ahead and create one!)
- Some codebase that you are going to build, preferably some .net code since I’m going to use that! (You need atleast some code to practice on! Don’t worry, if you don’t have one right now, just fork my repository and use it in your AzureDevOps Repo)
Link: https://github.com/akhilvatts/storage-blobs-dotnet-webapp
Don’t forget to star it, I’m telling you this repository would help you a lot in many other upcoming exercises and modules too. I’ve made some changes in the repository code so that your builds go without any hiccups.
Once you have the prerequisites ready, lets jump on to the reason why I’m writing this blog! (Read the heading :D)
I assume that now we are ready to start working on building an Azure DevOps Pipeline. Before, we go any further, I’m giving you the complete version of the file so that you can watch and learn what I tell you. So, it would be great to open this file in a new tab and then focus on what I start to tell you.
https://github.com/akhilvatts/AzureDevOpsYaml/blob/master/azbuildpipeline.yml
Now, there are two ways of writing a yaml pipeline, either you take help from AzureDevOps portal or you may write it on your own in some IDE by taking help by some third party plugins. But, I tell you, try the most simple way of writing the code in AzureDevOps pipeline editor. It will help you write efficient yaml pipeline and would save you from committing errors.
Since, this is our first pipeline, this is the best way.

But, when you would start writing complex and multi-file pipelines, then you definitely need knowledge, experience and an IDE where you would write. It would much efficient in IDE at that time and in that case.
Now, lets start!
When I would configure my pipeline in AzureDevOps, what are the first things I would consider?
- Which branch do we have to build? And on which branch should I place triggers on?
- Where do I build on code? Microsoft hosted machines, On Premise machines?
- What type of machine is it? Windows or Linux based?
- And build variables that I need to configure?
- What would be my build steps?
Once, I have answers to the above questions, I would start writing my build pipeline.
In our case, it’s a .net codebase in master branch that is to be built on a Microsoft hosted windows machine having Visual Studio installed on it. Since, it is a .net codebase, I would first need to restore packages using nuget tool and then build the codebase using MSBuild. Once the code is built, we would package the deployable code and publish the package so that we can deploy it at a later stage.
Now, lets break the above statement and write the yaml file.
“.net codebase in master branch that is to be built on a Microsoft hosted windows machine having Visual Studio installed on it.”
trigger:
- master

pool:
  vmImage: 'windows-latest'

variables:
  buildPlatform: 'Any CPU'
  buildConfiguration: 'Release'
“would first need to restore packages using nuget tool and then build the codebase using MSBuild”
steps:
- task: NuGetToolInstaller@1

- task: NuGetCommand@2
  displayName: 'NuGet restore'
  inputs:
    restoreSolution: '**/*.sln'
    feedsToUse: config
    nugetConfigPath: '$(Build.SourcesDirectory)\nuget.config'

- task: VSBuild@1
  displayName: 'Build solution'
  inputs:
    solution: '**/*.sln'
    msbuildArgs: '/p:platform="Any CPU" /p:BuildingProject=true /p:DeployOnBuild=true /p:outdir="$(Build.SourcesDirectory)\WebApp-Storage-DotNet\deploy"'
    platform: '$(buildPlatform)'
    configuration: '$(buildConfiguration)'
“package the deployable code and publish the package so that we can deploy it”
- task: ArchiveFiles@2
  displayName: 'Create Package'
  inputs:
    rootFolderOrFile: $$(Build.SourcesDirectory)\WebApp-Storage-DotNet\deploy\_PublishedWebsites\WebApp-Storage-DotNet
    includeRootFolder: false
    archiveFile: $(Build.ArtifactStagingDirectory)\WebPackage.V$(Build.BuildNumber).zip

- task: PublishBuildArtifacts@1
  displayName: 'Publish Artifact'
  inputs:
    PathtoPublish: '$(Build.ArtifactStagingDirectory)'
    ArtifactName: 'drop'
    publishLocation: 'Container'
Now, look at the final file that I shared earlier. I hope it would be making sense now.
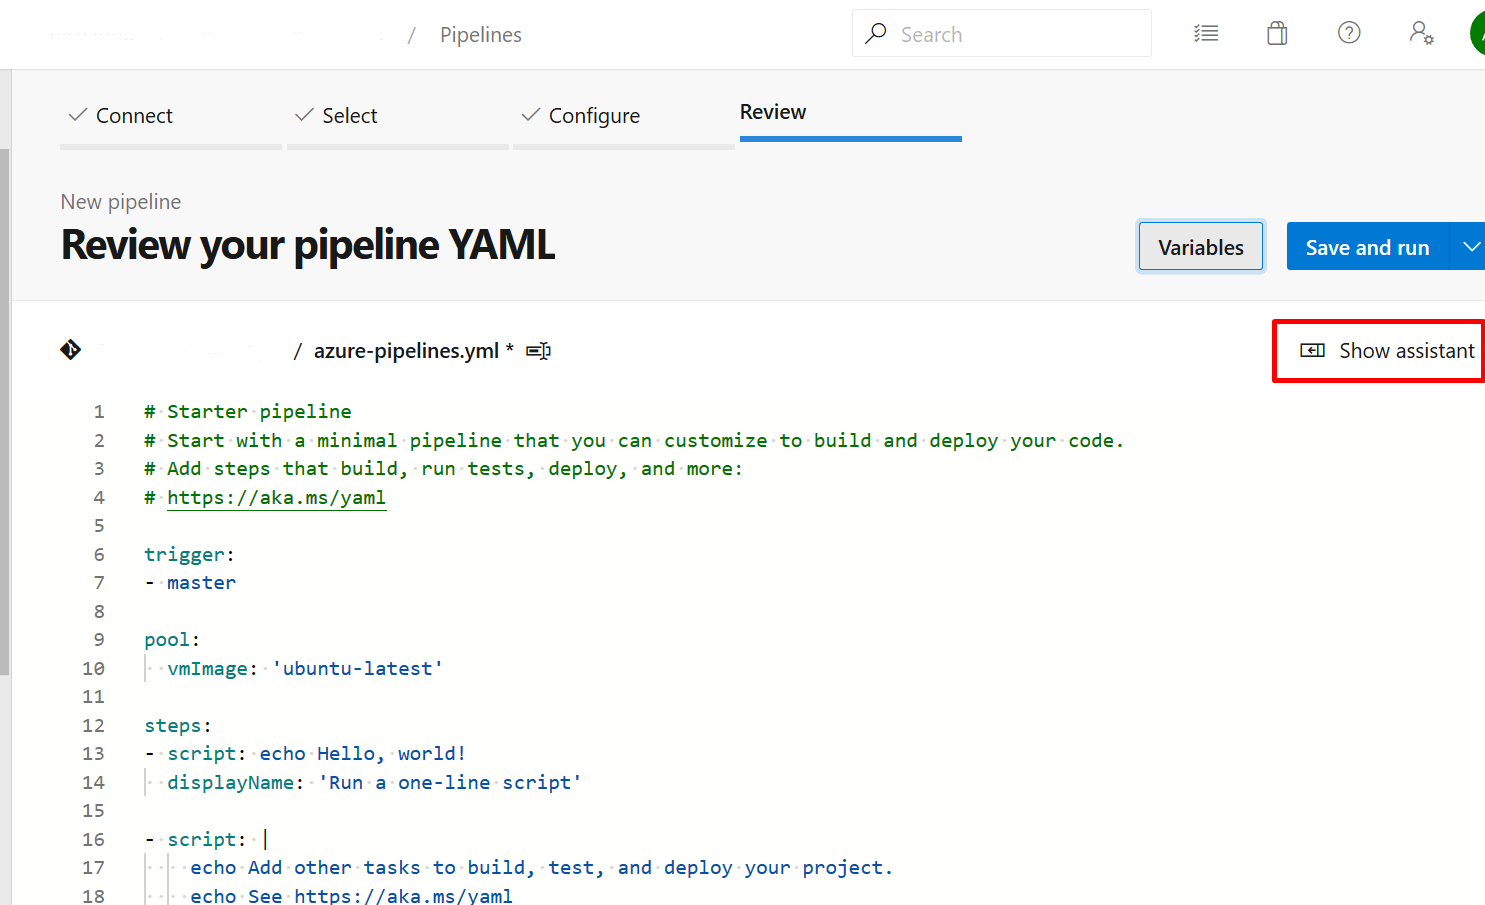
If you are wondering how would you get to know what parameters to write in each step, don’t worry!! Check the image I shared earlier. In that image, I have marked show assistant in that image. Click on that and type the task name there, it would show you that task along with the parameters.
And there you go!! Your pipeline is ready to work!!!
I hope this tutorial was helpful to you.
Thank you!